
This is the second half of a two-part guide. Part 1 covered the template decisions worth making before you write a bar, the conversation to have with your orchestrator, and the session cleanup itself. This part covers everything you send and what comes back to you. The phases continue in sequence from Part 1, so a reference to Phase Three points to a section of Part 1.
The full delivery checklist, covering both parts, is at the end of this article, with a fillable PDF version to download.
Phase Four: Naming, Ordering and Documentation
Simplify your track names for delivery
The names that serve you while writing carry more than we need. Mod wheel assignments, active keyswitch layouts, mic positions, layer numbers: none of it survives into a score. Reduce each name to the instrument and the articulation, and drop the rest.
The library abbreviation from Phase One, in Part 1, is worth keeping in your working template, since it tells you which patch you are hearing, but it can go at this stage. We cannot load your libraries, so the name is only useful to us insofar as it says what is being played.
Two things to leave in, because they are the cases where the name carries what the MIDI cannot: samples with a dynamic built into them, and samples where one note produces a whole gesture. Both were covered in Phase One, in Part 1, and both still apply.
One more. Where you bounced a MIDI part to audio for processing, give the audio track the same name as the MIDI track it came from. It costs nothing and it removes an entire category of confusion about which is which.
Order everything in score order
Woodwinds, brass, percussion, keyboards and harp, choir, strings, extras. If your project has a standard variation on this (for example, if percussion is never recorded with the orchestra and lives at the bottom with the non-orchestral material), that is fine, but be consistent about it across every cue so your layout only has to be learned once.
Write a text file when the MIDI cannot speak for itself
Some things simply do not survive the export. A short document sent alongside the files costs you a few minutes and saves a round of emails.
Worth writing down:
- What you actually want in any passage where the sample is standing in for something else
- Any habit that recurs across the score. If a rhythm is consistently written one way because of how the samples respond, say so once and we will apply it everywhere rather than querying it each time
- Whether tremolos are measured or unmeasured
- Whether trills are a semitone or a whole tone
- The keyswitch legend, if you keyswitch
- Anything you already know is wrong and have not had time to fix
For film, TV and games: these notes can also go in as markers in the session, which travel with the MIDI export. On a long cue they are worth having regardless, just to navigate by.
Phase Five: Audio Deliverables
The audio is not a supporting file. For everything MIDI cannot carry, and that is a great deal, it is the only source we have.
The core set
At minimum, deliver:
- A full stereo mix of the cue, exactly as you want it to sound
- Stems, split by section or by element as agreed
- A printed click track (film, TV and games; also relevant for any click-recorded concert project)
Everything must line up perfectly with the MIDI file when dropped into a clean session. If the audio and the MIDI disagree about where bar one falls, nothing downstream can be trusted.
Render with your effects baked in
Bounce your reference audio with the effects running, not bypassed. The reverb, the saturation, and whatever else shapes the sound are part of what you wrote, and we should hear the mockup as you have been hearing it. Most DAWs include insert effects in a bounce by default, but many also let you bypass them, so check that your effects are active before you commit to a long render.
If you are sending the session as well as the audio, you may want to hide the rendered tracks once they exist. They still play, but the track list stays readable. Worth asking first, though, since some orchestrators would rather see everything laid out and will simply unhide them.
Two kinds of audio that need particular care
Audio you recorded while writing. Anything played live and captured as audio, with no MIDI behind it. If it is going to be orchestrated, it needs to reach us isolated and clearly labeled, because the only way to write it down is to listen to it, and that is impossible inside a full mix.
Group these sensibly. A part built from several takes stacked for thickness does not need every take sent separately. Bounce each musical line once, so that what arrives matches the number of parts you actually wrote rather than the number of tracks it took to record them.
Audio that started as MIDI. Where you have bounced a sequenced line to audio in order to process it, you will have muted the original MIDI so it does not play twice. That mute has a consequence at export: muted regions typically do not travel with the MIDI file, and when they do not, the part is missing entirely when we open it.
Before you export, go back through and unmute every one of them. Most DAWs mark a muted region visually and offer a shortcut to toggle it, so this goes quickly. It is worth doing carefully, because a silently absent part is much harder to notice than a wrong one.
Print one-note gestures separately
Some patches produce a great deal of music from a single held note: a harp glissando, a rapid string run, a trill, a pre-built orchestral texture, a riser, a cluster. Whatever the sound is doing, the MIDI records one note and one duration.
Every one of these needs its own audio stem. If you can hear it in isolation, it can be written down. If it exists only inside the full mix, it cannot, and we will have to come back to you and ask what was supposed to be there.
Section stems
Isolated stems tell us what each line is. Section stems tell us how the sections sit against one another, which is a different question and one that matters for dynamics.
Ask what your orchestrator wants, because preferences differ. Some work happily from the full mix once they have the isolated material they need. Others want strings, brass, woodwinds, and percussion each printed separately as well, and find it much faster.
Either way, this is in addition to the isolated stems described above, not instead of them. If a passage cannot be heard clearly in the mix, print it separately regardless of what was agreed for the rest of the cue.
Format
Confirm before you render, but 44.1 kHz MP3 is a common preference. There is no orchestration benefit to higher resolution audio, and smaller files move faster.
Phase Six: Exporting the MIDI
You have cleaned the session. Now get the file out correctly.
The pre-export checklist
- Unmute every muted region. The most common single cause of a part arriving empty.
- Set your export range explicitly, starting at bar 1. Most DAWs do this by default, but stating it costs nothing and removes any question about where the file begins.
- Check how your DAW handles split regions. Some export each region on a track as a separate MIDI track, which turns one violin line broken into a dozen regions into a dozen violin parts. If yours does that, join the regions on each track before exporting. A quick test export will tell you.
- Select only the tracks you intend to send. If you built the target tracks from Step 8 of Phase Three, solo those so nothing else is picked up.
- Delete anything left over. Empty tracks and anything left over from your template, apart from the divider from Step 4 of Phase Three.
Export as Type 1, never Type 0
Export Type 1. It keeps each track separate, which is the whole point. Type 0 collapses everything onto a single track, and since an orchestral session runs well past the sixteen MIDI channels available, parts end up merged with no way to pull them back apart.
Include the tempo map and the markers
Your tempo map carries every tempo change and time signature change in the cue. Without it, none of that structure survives the journey, and all of it has to be entered by hand while cross-referencing your session.
Markers are also worth including. On a long cue they are a valuable structural reference.
File naming
Use the same base name across the MIDI, the audio, and the session so that everything for a cue is visibly related. In film and television that is the cue ID and title. For concert work, the movement or section name.
The _ORCH suffix from Step 1 of Phase Three stays on your working session only. The exported files do not need it, since by that point there is nothing to distinguish them from.
Consistency matters more than the particular scheme you choose, because dozens of files may be open at once and the fastest way to lose an hour is to be unsure which version of a cue you are looking at.
A note on MusicXML
Composers occasionally ask whether MusicXML would serve better than MIDI, since it carries what MIDI cannot: clefs, beaming, articulations, dynamics.
In practice, MIDI remains the standard, for two reasons. As of early 2026, most DAWs do not export MusicXML at all, and where the option exists it comes from the program’s own score editor rather than from the project itself. That means the file arrives already interpreted, with beaming, voicing, and spelling decided by software working from an unedited performance. Undoing those decisions takes longer than starting from clean MIDI.
The exception is if you have genuinely worked inside your DAW’s notation editor and the result already reads the way you want. If so, tell us and send it alongside the MIDI rather than instead of it. Otherwise, MIDI and good audio are what we need.
Phase Seven: Folder Structure and Handoff
(Written for film, TV and games, where one project can run to dozens of cues. Concert composers can strip this down, though the principle of keeping MIDI, audio, and reference material apart still holds.)
How you arrange the files matters more than it sounds. On a long project, a predictable structure is the difference between finding something in seconds and opening four folders to check.
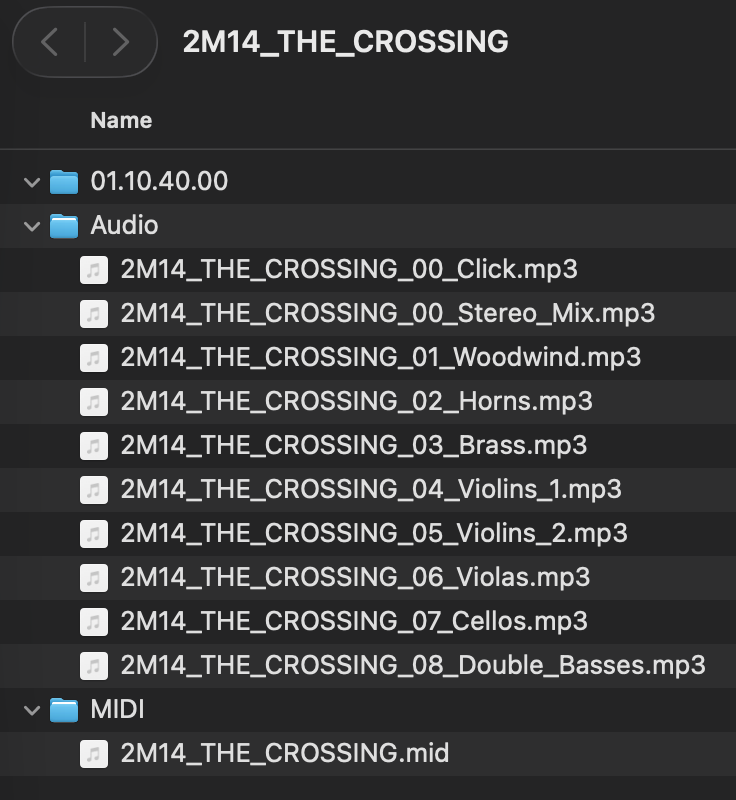
Give every cue its own folder, and put three folders inside it.
- MIDI. The finished export, and nothing else. One file.
- Timecode. An empty folder whose name is the cue’s start time. It exists so that the timecode is visible without opening anything.
- Audio. The stereo mix, the click, and the stems. If a stem needs breaking down further, because two instruments were printed together or a part was built from layers that should be heard apart, put those inside a further folder rather than loose among the main stems.
Build every cue folder the same way, down to the folder names. Predictability is worth more here than elegance, because the whole point is that nobody has to think about where anything is.
Then let us know. Upload everything, then send an email confirming the cue is posted. We do not monitor shared folders around the clock, so files that arrive without a note can wait a day before anyone sees them. Then start the next one.
Phase Eight: When Not to Clean at All
Phase Three opened with a warning, and this is it in full. The cleanup process is not universal, and there is a well-established practice that runs the other way. Find out which situation you are in before you spend a day quantizing.
On large film projects, the MIDI cleanup is often not the composer’s job. A dedicated preparation team handles it, working full time at turning raw composer sessions into readable orchestral sketches.
Where that team exists, the instruction reverses. They will ask you to send the MIDI exactly as it stood when you printed the audio, with nothing quantized, nothing tidied, and nothing removed, synth parts included.
That is not laziness on their part. They do this all day, with scripts and shortcuts built for it, and they would rather see exactly what you played than a version you have half corrected. Every change you make is one they have to notice and evaluate, and a well meant fix is harder to spot than an obvious error.
So ask first. If there is a prep team or a music assistant on the project, your job may be to send everything as it is. If you are working directly with an orchestrator, which is usually the case on smaller productions and on concert commissions, everything in Phases Three through Six applies.
Phase Nine: After the Files Leave Your Desk
You do not need to know how the sketch and score get built. But you should know what to expect back, and what your remaining responsibilities are.
Expect queries, and treat them as a good sign
You will hear from us during orchestration. That is the process working, not a sign that something has gone wrong. What we tend to ask about:
- Notes that look accidental. A pitch that sits outside the harmony everywhere else, or a chord that changes on one part and not the others. Sometimes these are deliberate, which is precisely why we ask instead of adjusting
- Writing that falls outside an instrument’s range, with a suggestion of where to put it instead
- More parts than players. Easy to lose track of when a section is spread across several tracks in a mockup, and only visible once it is on staves
- Doubling changes with no time to make them. A player moving between instruments needs bars to do it, and mockups do not show that constraint
- Divisi that outruns the section, and whether a passage needs an overdub to cover it
- Anything the material does not settle. Usually a gesture patch that arrived without its own stem
We do not quietly fix what looks like an error. If something is ambiguous, you get asked, because the alternative is guessing about your music. Which means the number of queries you receive tracks fairly closely with how much ambiguity was in the delivery, and is another reason for the text file described in Phase Four.
Expect meters and tempi to be reconsidered
The tempo you wrote at is not always the tempo that reads best. A cue written slowly, with the detail carried in very short note values, is usually easier to play if the tempo is doubled and those values halved. The reverse happens too: music sitting in long held notes at a fast tempo often reads more naturally written half as fast. Sometimes a passage sequenced in a simple meter reads better in a compound one.
None of this alters what the music sounds like. It alters how fast a player can take it in on first sight, which under session conditions is much the same thing as how well it gets played.
For film, TV and games: if the barring or tempo map changes, you get an updated MIDI file and tempo map back, so your session can be brought into line. Bar numbers are sometimes shortened as well, so that a cue beginning at 847 is renumbered from 47, which is quicker to call out and find. Whatever is changed, you will be told, so that nothing drifts out of sync between your session and the score.
Proofread the score properly
You will receive a score, usually as PDF. This is your last real checkpoint before parts are generated and printed.
Read it against your intent, not against your MIDI. Check that the orchestration says what you meant it to say, that nothing has been misread, and that every query raised during the process has been resolved. Once you approve it, the parts are produced from it.
Expect that the score will still not be perfect. It never is until an orchestra has played it. But if the preparation was done properly, the changes you make in the studio will be musical refinements rather than rescues.
Phase Ten: What Changes for Concert Composers
Most of this article applies regardless of destination, but the differences are worth stating plainly.
What you can skip:
- Timecode folders and session start times
- Printed click tracks, unless the piece is being recorded to click
- Cue ID naming schemes and per-cue folder structures
- The two-bar count-in at bar 3, unless recording
- The scheduling pressure of parallel orchestration teams
What matters more:
- The score is the deliverable, not an intermediate step. In film, the score exists to get a recording made and is then archived. In concert music, the score and parts are the enduring artifact. Players you never meet will read them, at ensembles you never visit. That raises the stakes on everything you send us, because ambiguity in the source becomes a permanent question in the printed part.
- Playability in a single reading. A recording session can retake a difficult passage twenty times. A concert cannot. Anything genuinely awkward will be exposed, so flag any passage you are unsure about and we can look at it before the parts go out.
- The ensemble’s actual roster. Concert commissions frequently come with instrumentation constraints. Check what the ensemble actually has before scoring for it, and tell us the exact roster rather than a generic section size.
- The ensemble’s timeline. Tell us when the parts are needed by the librarian, not when the first rehearsal is. Material usually has to be in players’ hands well before they play it.
- Publication. If the work is going to a publisher, house engraving standards apply and are usually stricter than session standards. Tell us early if this is the destination.
What stays exactly the same: everything in Phases One, Three, Four, Five and Six. Template design, sample delay compensation, transposition consistency, quantization, overlap removal, descriptive naming, score order, audio references for anything the MIDI cannot express, Type 1 export with the tempo map. The MIDI preparation is identical whether the score is headed for a scoring stage or a concert hall.
The Delivery Checklist
Template, before you write
- Session laid out in score order
- Sample attack delay compensated at the track, not by playing early
- Octave transpositions conformed across all libraries
- Articulation strategy chosen: split patches or standardized keyswitches
- Track naming convention established
- Two count-in bars at the head of the cue (if recording)
Session preparation
- Working copy made with _ORCH suffix; original untouched
- Instruments deactivated and released from memory, if sending the session
- Empty tracks, placeholder tracks and template flags deleted
- Mockup-only doubling layers removed
- Short divisi consolidated onto a single track
- Non-overlapping duplicate parts merged
- “NOT FOR ORCHESTRATION” divider created, with controller data in the region
- Non-orchestral material moved below the divider
- Tracks to be recorded at the top, in score order
MIDI cleanup
- Note starts quantized to the smallest division actually present
- Backward-snapping errors checked by eye and by ear
- Note ends set to their correct durations
- Legato overlaps removed
- Last note of every selection checked and trimmed
- Modulation, expression and aftertouch removed
- Keyswitches removed, or retained and documented
- Rubato and other loose passages left as they are
- Bass and other displaced instruments set to sounding pitch
Naming and documentation
- Track names reduced to instrument and articulation
- Built-in sample dynamics named in the track
- One-note gestures described, including harp pedal settings
- Bounced audio named to match its source MIDI track
- Keyswitch legend written, if you keyswitch
- Text file covering intent, trills, tremolos and known issues
Audio
- Stereo mix rendered with effects running
- Stems printed and clearly labeled
- Printed click track, if applicable
- Live-recorded parts isolated, grouped by musical line rather than by take
- One-note gestures and textures printed separately
- Section stems, if your orchestrator wants them
- Further breakdowns in their own subfolder
- Audio format confirmed in advance
- Everything aligned to bar 1 and to the MIDI
Export
- Every muted MIDI region unmuted
- Split regions joined, if your DAW exports them separately
- Export range set explicitly from bar 1
- Exported as Type 1, not Type 0
- Tempo map included
- Markers included
- Files named to convention, without the _ORCH suffix
Handoff
- Cue folder built with MIDI, audio and timecode subfolders
- Timecode folder named with the session start time (film, TV, games)
- Files uploaded
- Email sent confirming the cue is posted
Download this checklist as a fillable PDF: A4 · US Letter
If you are not sure your files are ready
Very few composers get all of this right the first time, and there is no reason you should. Most composers learn it in a control room or a rehearsal, watching time disappear into something that could have been settled weeks earlier.
If you would like to know how your material looks before committing to a full delivery, send us one cue or one movement. We will tell you what we see: what is clean, what will cause problems, and what is worth changing in your template so that everything after it arrives right the first time. No charge, and nothing attached to it.
Getting the delivery right is not about neatness. It is about making sure that the music the orchestra reads is the music you actually wrote.