
This guide comes in two parts. Part 1 covers everything that happens inside your session: the template decisions worth making before you write a bar, the conversation to have with your orchestrator, and the cleanup that turns a mockup into readable data. Part 2 covers everything you send and what comes back to you: naming and documentation, audio deliverables, the MIDI export, folder structure, and the full delivery checklist. The phases run in a single sequence across both parts, so a reference to Phase Six in Part 1 points to a section of Part 2.
Why this matters
There is a moment in every orchestral project when the music has to come off the screen and onto the page. You have spent days, sometimes weeks, inside a DAW building a mockup. You have stacked two or three sample libraries on the same line to get the sound you were after, pulled legato notes ahead of the beat so the attacks land in time, and left keyswitches sitting down in the low octaves. There are tracks in the session that exist for one passage and nothing else. It sounds finished. And then it has to go in front of sixty players, on paper, on a music stand, with a conductor about to give the downbeat.
That crossing is the orchestration delivery. It is the handoff from you to your orchestrator and engraver, and it is one of the least discussed and most consequential stages of the whole workflow. Done well, it is invisible. When it goes wrong, it adds to the budget at exactly the point where time is most expensive: a full orchestra sitting at a fixed hourly rate while the conductor stops the take, turns to the booth, and asks whether the double basses are meant to be doubling the cellos an octave below or playing in unison with them.
This guide covers everything on your side of that handoff, from the template decisions worth making before you write a single bar through to the moment the files leave your machine. It is deliberately detailed, because almost every problem we encounter in a MIDI to Score project traces back to a small decision made weeks earlier in a DAW session.
A note on scope. Most published material on this subject is written from the film and television perspective, because that is where the deadlines are tightest and the money is largest. But the underlying craft applies just as much to a concert composer preparing a commissioned work for a symphony orchestra, a wind ensemble piece, or a chamber work headed to a premiere. Where a step exists only because of picture, timecode, or a scoring stage schedule, it is flagged as such. Everything else applies to both worlds.
What this guide does not cover is what happens after the files reach us: the import, the sketch, the orchestration decisions, the engraving, the parts. That is our work, and it is not something you need to think about. Your job ends when the folder is uploaded and the email is sent.
Phase One: Before You Write a Note
The single largest time saving in orchestration delivery does not happen during delivery. It happens months earlier, in how you build your template. Some of the cleanup described in this guide is unavoidable: a mockup is played rather than typed, and anything played by hand has to be quantized before it can become a score. But a good deal of the rest is avoidable, and comes down to template decisions that could have been made differently at the outset.
Build your template in score order from the start
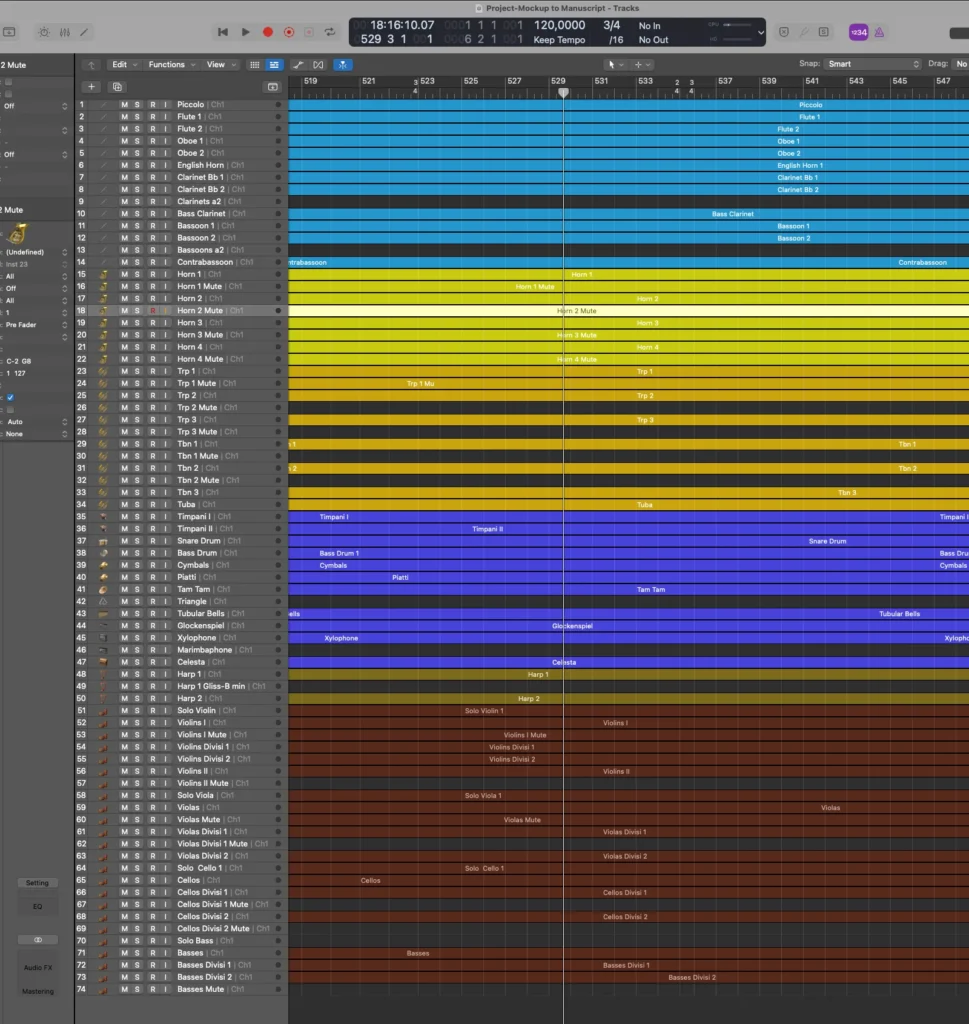
Your DAW session should read top to bottom in the same order a score reads: woodwinds, brass, percussion, keyboards and harp, choir, strings, then everything else. This is not aesthetics. When your orchestrator receives your MIDI and begins moving material into a scoring template, they want to work down the page in a single pass. If your flutes are at the top and your oboes are buried near the double basses, they scroll. Constantly. On a session with two hundred tracks, that scrolling adds up to hours across a project, and that time comes out of the project budget.
Laying the session out in orchestral order lets the work proceed almost line by line, rather than searching for each instrument in turn. Setting the template up correctly once means never thinking about it again.
Compensate for sample delay in the template, not in the notes
This is the most valuable single tip in the entire process.
Sample libraries do not speak at the instant you ask them to, due to how each developer edits the instrument samples. The delay varies by library, by instrument, and by articulation within the same patch, so perfectly quantized MIDI still will not sound locked to the grid, and layering two or three libraries on the same line stacks those differences into something audibly untidy.
There are two ways to deal with this and only one of them is practical. You can nudge every note off the grid by hand to compensate, which is slow and has to be redone whenever you change library. Or you can apply a negative delay to the track, so the MIDI stays where you wrote it while the sound arrives when you meant it to. A negative delay holds regardless of tempo, and once it is set you can copy a line from one library to another and have both play in time.
The catch is articulation switching. A track-based negative delay applies a single value to everything on that track. That is fine when each articulation sits on its own track. It falls apart on a keyswitched track, because the delay differs from one articulation to the next: whichever articulation you tuned the value for will be right and the others will be early or late, which returns you to nudging notes by hand. As of this writing, Digital Performer is the exception, since its articulation maps can carry a different delay for each articulation on the same track.
Legato is the hardest case, for two reasons. The first note of a legato phrase does not trigger a transition at all, because there is nothing before it to transition from. It plays as a sustain, so a delay tuned for legato will always rush it. And some libraries select the transition speed from velocity, so a single line can carry several different delays and no one value will cover them all.
Finding the values. Some developers publish them. Where they do not, you measure by ear, or print a quantized line to audio and measure the offset directly. A community-maintained negative delay spreadsheet collects values for a great many libraries and is much the fastest starting point, though it is worth fine-tuning by ear once it is in your own template.
Once the compensation is in place, you write directly on the grid, the samples still sound in time, and by the time you reach orchestration prep the majority of your note attacks are already where they need to be.
One thing to watch: a negative track delay pulls your controller data early along with the notes. This is usually harmless, but it is worth checking if you have timed dynamic or expression curves to specific points in the music.
Handled this way, you absorb the bulk of the quantization work as you write, almost without noticing it. What remains is tightening note releases, removing legato overlaps, and quantizing the first note of each legato phrase, which is a far smaller job than starting from a session where nothing sits where it was written.
Conform octave transpositions across your libraries before you start
Different developers make different decisions about what sounds when you play a given MIDI note. A contrabass patch from one developer plays back exactly as written: play C1 and you hear C1. Another developer’s contrabass sounds an octave below what you played, usually so that the keyswitch layout stays consistent across their whole range.
While you are writing, this is invisible. Everything sounds right, so you never think about it. At delivery it becomes a genuine problem. If two layered libraries are sounding in unison but their MIDI sits an octave apart, we are looking at data that contradicts itself, and the octave you actually intended becomes a question rather than a fact.
Fix this before you write. You can adjust key zones inside your sampler to conform the transposition, or insert a MIDI transformer to transpose the output of the offending tracks by an octave, so that everything sounds correct while sharing the same written MIDI pitch. Either route leaves one unambiguous octave in the MIDI, which is what we read the part from, checked against your audio rather than against your libraries.
There is a related but separate issue worth understanding clearly. Most notation software treats imported MIDI as sounding pitch rather than written pitch, and while import options differ between programs and versions, sounding pitch is the safe assumption. A double bass part is written an octave above where it sounds, so the MIDI you export needs to be at sounding pitch. In practice that means your bass material sits below the cellos in your piano roll, which looks wrong on screen and is correct. The same principle applies to other instruments with standard octave displacements, such as piccolo and contrabassoon. Send us sounding pitch MIDI tracks and the written transpositions will take care of themselves.
Decide how you will communicate articulations
There are two workable approaches and they lead to different cleanup jobs.
The first is split patches: every articulation lives on its own track. Violin 1 Legato, Violin 1 Tremolo, Violin 1 Pizzicato, Violin 1 Spiccato. The track name tells us everything, and no keyswitch legend is needed. This produces more tracks but requires almost no explanation.
The second is keyswitching, where a single track carries multiple articulations selected by low MIDI notes or by an articulation map. This produces a tidier session but leaves keyswitch notes cluttering the bottom of the piano roll, and raises the question of what each one does.
If you keyswitch, standardize it so that the same keyswitch always means the same articulation across your entire template, and supply a written legend as a courtesy. Articulation can usually be determined by ear, but a legend removes a category of question entirely, and every question avoided is a phone call that does not interrupt you.
Adopt a descriptive track naming convention now
A reliable default format is: abbreviated library name, then instrument, then articulation or effect. For example, “EW Cello Marcato”. Short enough to read in a narrow track header, specific enough to remove ambiguity. Track names like “Kontakt 1” and “Kontakt 345” tell us nothing at all.
Two situations deserve special attention because MIDI cannot express them:
Samples with built in dynamics. A horn crescendo patch, an sfp patch, a pfp swell. In the MIDI, all of these are one sustained note with no dynamic information whatsoever. Name the track with the dynamic the sample performs, not just the instrument.
Samples where one note produces a gesture. A harp glissando patch where the whole glissando is baked into a single sample, an aleatoric cluster, a riser, an evolving texture. “Harp Glissando” as a track name means nothing on its own, because what a harpist needs is the pedal setting the glissando sweeps through. Name the pitch collection in the track, or note it in your text file.
Start your cue with a count-in
(Primarily film, TV and games, though useful for any recorded project.)
Leave two empty bars at the head of the cue so the click has somewhere to count from before the first entry. Starting your music at bar 3 is the usual way to do it.
Get your mockup balance close to your intended dynamics
Take some care over velocities and relative instrument volumes in the mockup, closer than you might otherwise bother with. Written dynamics are an interpretation of your MIDI combined with your audio reference. If your horns are quiet in the mockup because you never got round to riding the fader, that is the impression that carries through. Dynamics alone can make or break the feel of a cue.
Phase Two: The Conversation Before the Files
Before any files are exchanged, there is a conversation to have. If you are working with an orchestrator for the first time, this is where the terms of the whole project get set.
Topics worth covering:
- The nature of the project, its style, and any musical references
- How many minutes of music you expect to write
- The budget, including orchestration and copying fees
- Which instruments will be orchestrated and which will stay as samples in the final mix
- Whether there is choir, or non-orchestral and folk instrumentation
- The schedule, worked backwards from the delivery date of the finished recordings
- What materials are preferred: MIDI file only, whole DAW session, audio mockups, and in what format
- Whether conducting is required
- How much of the administration is being handled externally, such as booking studio time, engineers, players, and travel
From that conversation, your orchestrator can propose an orchestra size, recommend section numbers including any woodwind or brass doubling, estimate the number of sessions required, and price the whole project. As a rough planning figure, a four hour orchestral session will usually yield somewhere near twenty minutes of finished material, and a three hour choir session around fifteen. Treat those as a starting point only. The real number moves a long way depending on the ensemble and on how many takes you want.
On delivery format specifically, there are two things worth confirming rather than assuming:
Audio format. Many orchestrators ask for 44.1 kHz MP3. Nothing in the orchestration process benefits from higher resolution, and smaller files move faster between people. Confirm anyway, since preferences differ.
MIDI file versus whole session. Practice varies, and it varies for good reasons. Some orchestrators want a MIDI file and nothing else, because a session opened without its libraries is mostly missing plugins and silent tracks, and because there is rarely anything in a session that cannot be obtained from a well prepared MIDI file and a good set of stems. Others prefer to receive the whole session, because it keeps the MIDI, the audio, and the tempo map together and in sync, it removes any possibility of export error, and the tracks arrive colored and named rather than as a wall of undifferentiated gray. Ask before you prepare.
For concert composers: most of this conversation still applies, but the emphasis shifts. There is usually no team of orchestrators working in parallel, no cue numbering, and no picture. What matters more is the ensemble’s actual roster, the rehearsal time available, any instrumentation restrictions written into the commission, and the deadline set by the ensemble’s librarian rather than by a scoring stage booking.
Phase Three: Cleaning the Session
Before you begin, find out whether this is your job. On large film and television productions the MIDI cleanup is frequently handled by a dedicated preparation team, and where that team exists they will usually ask you to send the session exactly as it stood when you printed the audio, with nothing quantized and nothing removed. Cleaning it first makes their work harder, not easier. If there is a music assistant or a prep team on the project, ask before you spend a day on any of what follows. Phase Eight, in Part 2, sets out how to tell which situation you are in. If you are working directly with an orchestrator, which is the usual case on smaller productions and on concert commissions, everything below applies.
Step 1: Duplicate the session. Always.
The obvious first step, and still worth saying: work on a copy and keep the original untouched as a reference.
Use a clear naming convention. Appending _ORCH to the duplicate file works well. In film and television, cues usually carry an ID showing where they fall in the picture, so 2M14_THE_CROSSING_ORCH reads as reel 2, music cue 14, titled “The Crossing,” prepared for orchestration. For a concert piece, SymphonyNo2_Mvt1_ORCH does the same job.
This matters for a practical reason beyond safety. Throughout the cleanup you will want to refer back to what you originally wrote, to check whether an odd note was intentional or whether a rhythm has shifted during quantization. You cannot do that if you have destroyed the original.
Step 2: Make the session openable on someone else’s machine
Your orchestrator may happen to share your DAW, and may even own some of the same libraries, but you cannot count on either, and a full template match is very unlikely. If you are sending a session file rather than just a MIDI file, or even if you are simply working locally on a large template, there are two things worth doing.
Unload the instruments rather than just muting them. Muting silences a track but leaves the instrument loaded. Most DAWs have a separate command that deactivates or disables the track and releases the plugin from memory, and that is the one you want. It prevents the recipient from being met by an endless run of “cannot find library” dialogues, clicking abort and ignore dozens of times. It takes one command at your end, and it spares us time you would otherwise be paying for.
Consider opening the session with the audio engine off. If you are working purely to prepare a MIDI export, most DAWs offer some way to open a project without instantiating plugins, which saves waiting for a large template to load. It is worth doing when you are certain you only need to look at the notes. The trade is total, though: no plugins means no playback at all, and many composers would rather wait for the samples and keep the ability to check a passage by ear while quantizing.
Step 3: Decide what is actually being orchestrated
This is a judgment call that only you can make, and making it explicitly saves everyone downstream a great deal of guesswork.
Remove empty and unused tracks. If you use MIDI flags or placeholder tracks in your template, delete them. Only tracks that actually contain data should be exported. Empty tracks in the export mean time spent working out that they are empty.
Remove mockup-only layers. This is usually the single biggest reduction. Composers routinely double string lines across multiple libraries purely to thicken the mockup sound. If you layered several libraries for production quality, keep one for orchestration. We need each part once, not once per library.
Consolidate short divisi. If you have a second Violin 1 track that exists only because there is a one note difference in a two bar passage, copy that note into the main line so we see a single track with a brief divisi, rather than two near identical tracks that have to be compared bar by bar.
Merge parts that do not overlap. Where a single player’s material is spread across several tracks that never sound at the same time, combine them. The number of tracks should match the number of players, not the number of times you reached for a new one.
Predetermine what will be recorded. Very often not everything goes to the orchestra. Percussion may be tracked separately at your own studio. Some sampled elements may stay sampled in the final mix. Some articulations, such as a sampled pizzicato ostinato running underneath live sustained strings, may be deliberately left as samples because the library sounds good and orchestral time is expensive. Drag everything that will be recorded to the top in score order, and everything that will not to the bottom, so the material we need reads straight down from the first track.
Step 4: Build a “Not For Orchestration” divider
Do not delete non-orchestral material. Separate it.
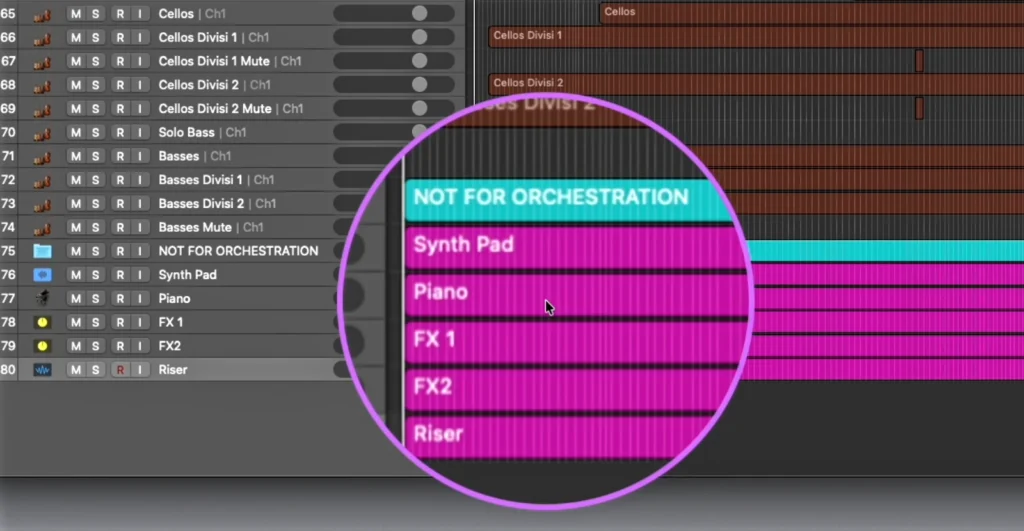
Create a MIDI track named “NOT FOR ORCHESTRATION” and draw a region across the full length of the cue. Put some controller data in the region so the track survives the MIDI export. Then place every non-orchestral track underneath it.
The reason to keep this material rather than strip it out is that we want to see everything even when we are not orchestrating it. Reference staves routinely go into the conductor’s score. If a cue has strings and piano and the piano is not being recorded, the piano may still be notated so the conductor knows what is happening in the final mix. That decision is made cue by cue, and it cannot be made if the material has been hidden.
There is a further and more serious reason. Synth and sound design material sometimes lags behind the orchestral writing during revisions, and a cue can reach the session with electronic elements from an earlier version clashing against the current orchestration. That is only catchable if everything is visible.
Step 5: Quantize, in three passes
Quantization is the most time consuming part of MIDI cleanup and the part most worth setting up key commands for. Whichever DAW you use, assign shortcuts for quantize note attacks, quantize note releases, and set note duration. That third one is invaluable for ostinato parts.
Pass one: note starts. Work out the smallest rhythmic division actually present in the passage and quantize to that. If the fastest thing in a section is an eighth note, quantize to eighths, not to sixteenths or thirty-seconds. Over-fine quantization preserves exactly the timing errors you are trying to remove.
Watch for a specific and common failure, and it is the main reason the template advice in Phase One is worth the trouble. Legato notes played well ahead of the beat, so the sample speaks on time, can sit closer to the previous subdivision than to the one you intended. Quantize, and they snap backward. With an eighth note grid, a whole run can land one eighth early, looking entirely plausible until you compare it to the surrounding material. The same thing happens on a smaller scale with any part played in real time rather than entered on the grid. The fix is simple: select the affected notes and nudge them across. But you have to be looking for it, so check by ear as well as by eye.
Pass two: note ends. Note releases matter more than composers expect. An eighth note held slightly too long stops being an eighth note. It arrives tied across into the next beat, or as a dotted value, or with a stray sixteenth attached. Be specific about length and about exactly where notes end, so the material comes through at the duration it is genuinely supposed to be rather than as strange holdovers that then need correcting by hand.
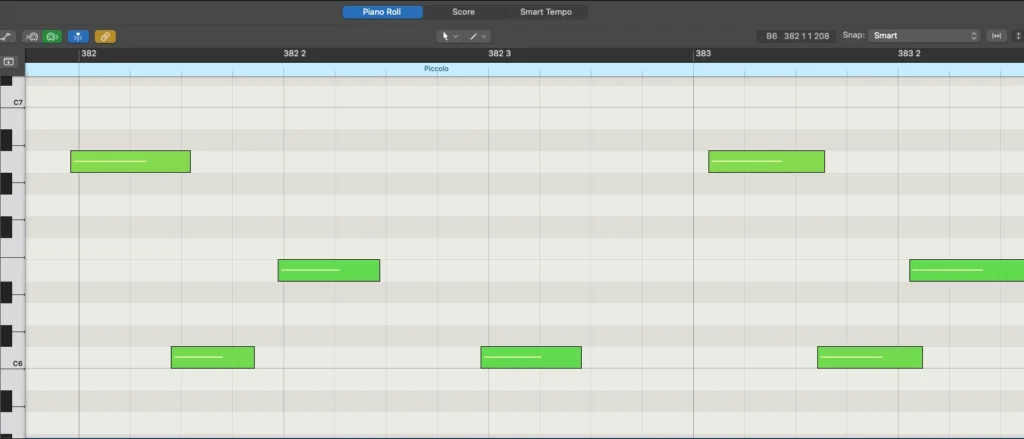
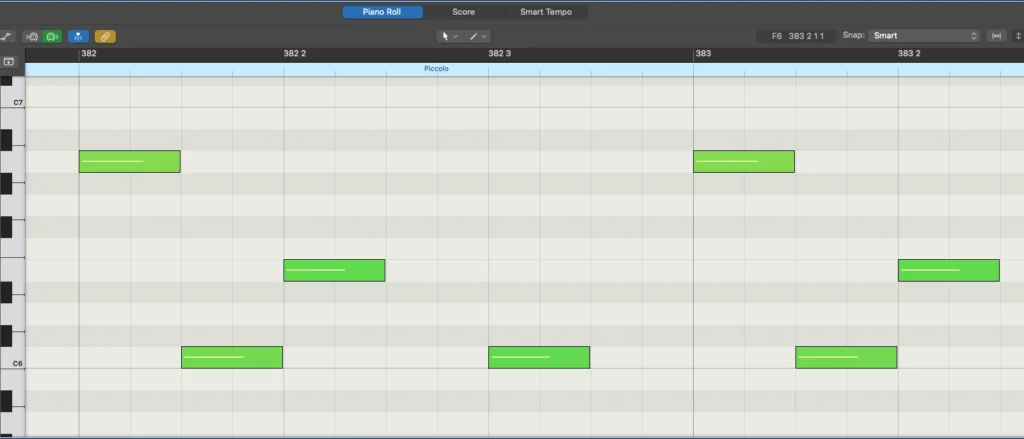
Pass three: overlaps. Legato patches require overlapping notes to trigger the transition. That overlap cannot be read as a single line. It looks like polyphony, and it produces a mess of ties and layered voices.
Most DAWs have a command for this, though it is not always where you would expect, and it is worth finding yours and learning the shortcut. The names vary, but they all describe the same operation: extending each selected note so that it ends exactly where the next one begins. It cleans up the data across an entire selection at once without altering the phrasing.
One warning. The final note in a selection has nothing to join to, so it will usually stretch to the end of the region or the end of the track. Always check the last note and trim it manually to where the phrase actually ends.
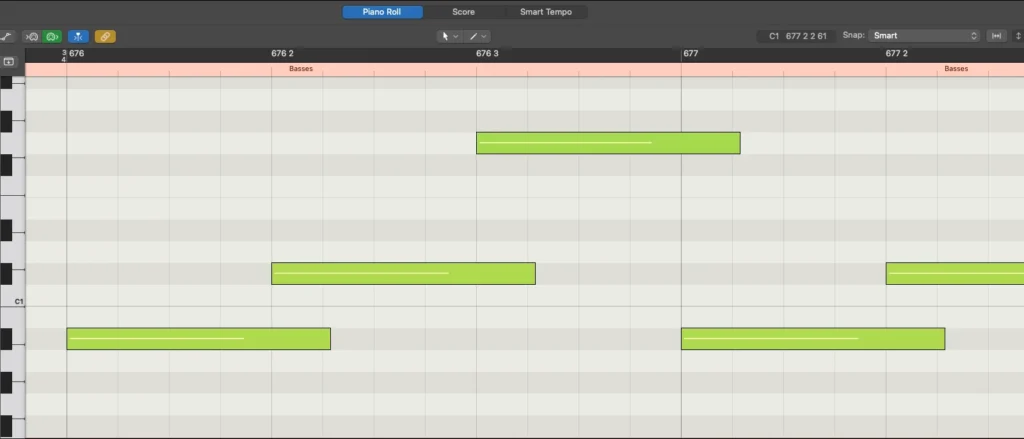
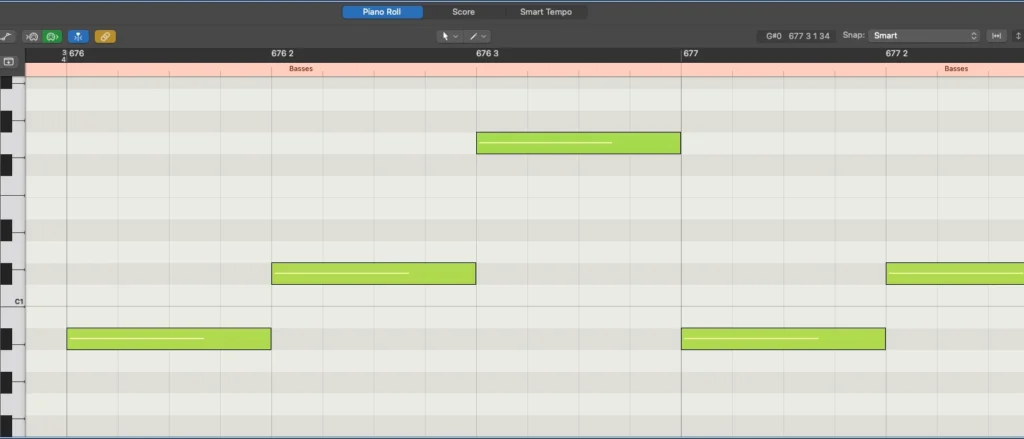
An efficient practical approach is to work in alternation: quantize the starts, run the command across the selection, then find the points where you deliberately want a gap, before a big entry or at the end of a phrase, and reset that note end manually before running the command on the material before it.
With all three passes done, verify visually. Most DAWs let you open every region at once in a single editor view. Do that and scan for notes that are not sitting on the grid. Errors that survive quantization tend to be visible immediately at that zoom level, and it is much faster than checking track by track.
Step 6: Know when to stop cleaning
This one runs against instinct, which is probably why it gets less attention than the rest.
Some passages will not quantize cleanly. Rubato phrases, deliberately loose rhythms, nuanced material where the human timing is the music. You can spend an hour forcing one of these into a grid and produce something that is both wrong and harder to fix than what you started with.
Do not over-clean. As long as you have provided clear stem splits so every voice can be heard in isolation, labeled everything clearly, and made sure your MIDI, stems and printed click line up perfectly, imperfectly quantized material is entirely workable. In tricky passages we would often rather you left it alone, because the risk of a well intentioned correction introducing an error that then has to be detected and undone is higher than the cost of transcribing the passage from your audio.
For film, TV and games: there is a scheduling pressure here that concert composers do not face. Once a production reaches any real size, the orchestration is split across several people working at the same time, coordinated by a lead who assigns cues as they come in. That parallel work peaks in the last stretch before the session, which is also, awkwardly, when you are most likely still writing. Cues get revised and approved on a rolling basis, and orchestration on the early ones begins long before the last ones exist.
What follows from that is a question of sequencing rather than quality. A cue that is merely good and arrives on schedule is worth more to the production than one that is flawless and arrives late, because everyone downstream is waiting for the next cue. If you have three cues unsent, do not spend the afternoon refining the one already delivered.
Step 7: Strip the controller data and keyswitches
Once the notes are correct, remove the performance data that carries no notational meaning: modulation, expression, aftertouch, and the keyswitch notes themselves. They add clutter to the piano roll without telling us anything the notes and your labeling do not. One exception: leave the controller data in the divider region from Step 4. That is what keeps the track alive through the export.
Before deleting the keyswitches, make sure the articulations they selected are recorded somewhere else. If you use split patches, they already are, in the track names. If you keyswitch, that is what the legend from Phase One is for, so write it before the keyswitches disappear.
If you would rather leave the keyswitches in the export rather than delete them, that is fine. Say so in your notes and send the legend either way, so we know that the low notes are switches rather than music.
Step 8: The dedicated target track method
There is a more advanced approach worth knowing about, because for composers who are fast in a DAW it can be a substantial time saver, and because it produces the cleanest deliveries we receive.
Rather than cleaning the mockup tracks themselves, you add a second set of MIDI tracks to your template, one for each staff that will appear in the finished score. Nothing is assigned to them and they produce no sound. Their only job is to hold the version of the music you intend us to read.
You then work through the mockup, copying material across and resolving the orchestration as you go: which line belongs to which instrument, where a section divides, how the voices of a chord distribute across the players available. Everything that lands in these tracks is quantized, at sounding pitch, and the correct length.
When you export, you solo and select only this second set. What we receive is what you want played, rather than a record of how the mockup was assembled.
The decisions that belong here are the ones a piano roll cannot imply: whether a doubled line should stay doubled or move to a single section, which instrument carries a figure when two could, how a chord is spread so that the balance in the room matches the balance in your mix, and where a section should divide rather than gain a new staff. Made now, they are unambiguous. Left until later, they become questions.
For concert composers: this method suits you particularly well, because there is no orchestrator downstream to make these calls on your behalf. Whatever you decide has to be recorded somewhere or it is lost. The parallel MIDI tracks become your orchestral sketch, and the export becomes a finished orchestral statement rather than a raw performance record.
What comes next
That is the session. Everything from here concerns what you send and how it is packaged: reducing your track names to what a score can use, the audio deliverables that carry what MIDI cannot, exporting the file correctly, building the cue folder, and knowing what to expect back once the material reaches us.
Continue to Part 2: Exporting and Delivering Your MIDI. The full delivery checklist, covering both parts of the guide, is at the end of Part 2.
If you are not sure your files are ready
Very few composers get all of this right the first time, and there is no reason you should. Most composers learn it in a control room or a rehearsal, watching time disappear into something that could have been settled weeks earlier.
If you would like to know how your material looks before committing to a full delivery, send us one cue or one movement. We will tell you what we see: what is clean, what will cause problems, and what is worth changing in your template so that everything after it arrives right the first time. No charge, and nothing attached to it.
Getting the delivery right is not about neatness. It is about making sure that the music the orchestra reads is the music you actually wrote.